
Render
The render starts grainy and gets cleaner with every sample: one more pass of light through the scene. It stops by itself at the sample target. Moving the camera or changing the scene starts it again from the first sample.
The settings that matter most are in the top bar. The Render tab has all of them.

Draft and Final
Draft and Final in the top bar switch the quality with one click.
| Draft | Final | |
|---|---|---|
| Samples | 8 | 64 |
| Output width | 1920 px | 1920 px |
| Bounces / glass bounces | 4 / 4 | 8 / 8 |
| Denoiser | on | on |
| Upscale (FSR) | Balanced · 67% | Off |
Draft answers quickly while you set up the shot. Final is for the picture you keep. Each mode remembers its own values: change the samples or the size while Final is on, and Final brings those back next time.
Every model, project or template you open starts in Draft. Press Final when the shot is ready.
Samples
The samples menu in the top bar (or Stop at in the Render tab) sets when the render stops. More samples mean less grain and a longer render. With the denoiser, 64 to 256 samples are usually enough; without it, a clean image may need 512 or more. Never stop keeps refining until you change something.
The counter shows the samples done and the target, for example 40 / 64, with the time it has taken next to the progress bar.
Output size
The size menu in the top bar (or Output size in the Render tab) sets the width of the picture in pixels: HD 1280, Full HD 1920, 2K, 4K, 5K or 8K. The height follows the frame shape chosen in the Camera tab (16:9, 4:5, 1:1…). Custom size… in the Render tab lets you type a width or a height.
A bigger image takes longer per sample and needs more memory. The lab renders at most about 13 megapixels: 4K fits, while 5K and 8K at 16:9 are lowered to fit, and the line under the menu shows the size you really get.
Upscale (FSR)
Upscale (FSR) in the Render tab lets the lab trace the picture at a smaller size and scale it up to the output size with AMD FidelityFX Super Resolution. A smaller picture converges much faster: on a test scene, a denoised Full HD Draft took 3.4 s without it and 1.7 s at Balanced · 67% (Fast · 50% took 1.4 s). The choices are Off, Quality · 77%, Balanced · 67% and Fast · 50%.
Draft uses Balanced; Final keeps it off, so the picture you save is traced at its full size. Fine detail (small text, thin lines) can look slightly softer at 50%.
Bounces
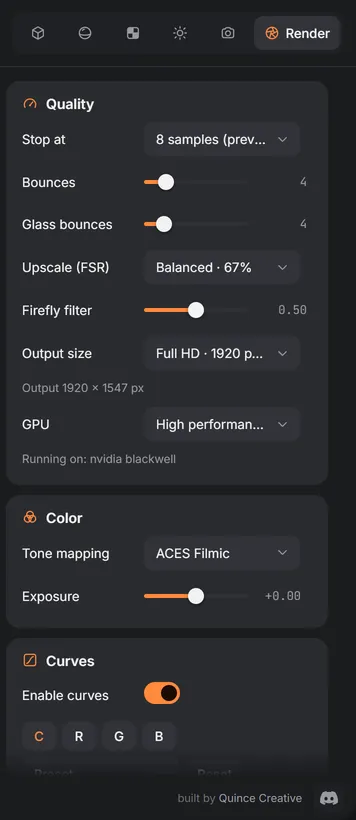
- Bounces: how many times light may bounce from surface to surface. More bounces brighten corners and the inside of open shapes. 4 to 8 is plenty for most products.
- Glass bounces: how many times light may pass through glass, liquid and other clear materials. Too few leave clear parts dark or speckled with black dots; use 8 or more for bottles and glassware.
- Firefly filter: removes the single very bright pixels (“fireflies”) that sharp reflections of small lights can leave. Higher filters more, but can dull very sharp highlights.
Color
- Tone mapping turns the light of the render into the colors of the screen. ACES Filmic gives a film-like look with rich contrast and is a good default. AgX keeps bright colors more natural and is gentler on saturated products. Khronos Neutral keeps product colors closest to their real values. None (linear) applies no curve.
- Exposure brightens or darkens the image in photographic stops (EV), like the exposure of a camera.
Changing these does not restart the render.
Curves
Curves, under Exposure, work like the curves of Blender’s color management: a square where the horizontal axis is how bright a pixel is now and the vertical axis is how bright it becomes. A straight diagonal changes nothing.
- Enable curves switches them on and off without losing the shape. Whether they are on is saved with states and projects.
- C (combined) changes all colors together. Pull the middle up to brighten midtones, or make an S shape for more contrast.
- R, G and B change one color on its own, for tints (a blue curve pulled down warms the picture). Each is applied after C.
- Click the curve to add a point, drag a point to move it, double-click (or right-click) a point to remove it. The two end points only move up and down.
- Preset… starts from Contrast, Strong contrast, Brighten midtones, Darken midtones, Lift shadows or Faded blacks (this resets the R, G and B curves). Reset brings back the straight lines.
The curves are applied to the finished picture, after tone mapping and the denoiser, and are included in Save PNG. They are drawn live and never restart the render. They work with Enable effects off, and are saved with states and projects. The picture keeps 16 bits a channel until the curves are applied, so even a steep curve does not turn a smooth gradient, like a studio background, into visible bands; a very fine noise (one step of brightness) hides the steps of the 8-bit screen and PNG.
Speed and your graphics card
- GPU chooses which graphics card the browser is asked for, on computers that have two (a laptop with built-in and NVIDIA or AMD graphics, say). High performance asks for the faster card. The change takes effect after a reload, and the line below shows the card the lab is really running on.
The lab uses the slower graphics card? Windows decides for the whole browser. Open Settings → System → Display → Graphics, find Chrome or Edge, set it to High performance, and restart the browser.
Denoiser
The denoiser (Intel Open Image Denoise) removes the last grain from a finished render in a second or two. It runs by itself when the render reaches its sample target, if Auto denoise is on, or when you press Denoise now. The Denoise button in the top bar switches Auto denoise on and off. Both Draft and Final have it on by default.
- Quality: Fast uses the small network, Balanced the full one; Balanced keeps a little more fine detail and takes longer; it is the default, and templates open with it.
- Albedo + normals: two extra guide pictures of the colors and the shape of the product. They keep edges, labels and textures sharp. Leave it on.
The Denoised / Raw switch in the top-right corner of the viewport compares the two; holding the D key shows the raw picture until you let go. The switch is hidden while Denoise is off. Save PNG saves the one on screen and says which it is.